As a sewist, you should understand the old saying the devil is in the detail better than anyone else. When creating handmade outfits, the details are (almost) everything! An unravelling thread or a wonky stripe and the entire garment isn’t up to scratch – at least for us perfectionists.
If you’re anything like us, the last thing you want is to ruin your hard work with a wonky, creased, or chewed-up hem. That’s the sort of thing that nightmares are made of. Sewing hems is also pretty tedious, but it doesn’t have to be! To save you from boredom and ensure you sew straight hems every time, we’ve put together a little guide with everything you need to know to hem like a pro.
Few Key Steps Before You Hem
Before we begin, we wanted to note that these hems are the essentials that everyone can do from home. Once you’ve got solid foundations in place, you can start to branch out into more advanced hemming techniques. There are plenty of decorative options out there, but let’s get the basics nailed now.
Have you ever finished a hem perfectly, only to go back to it a few days later, and it’s all over the place? It might seem like a mystery, but it’s actually the fabric. Depending on how you’ve cut your pattern, your fabric will hang differently, and it needs to adjust before you sew your hem. Hang your handmade creation for at least a day – ideally two – to let the fabric drop before sewing your hems.

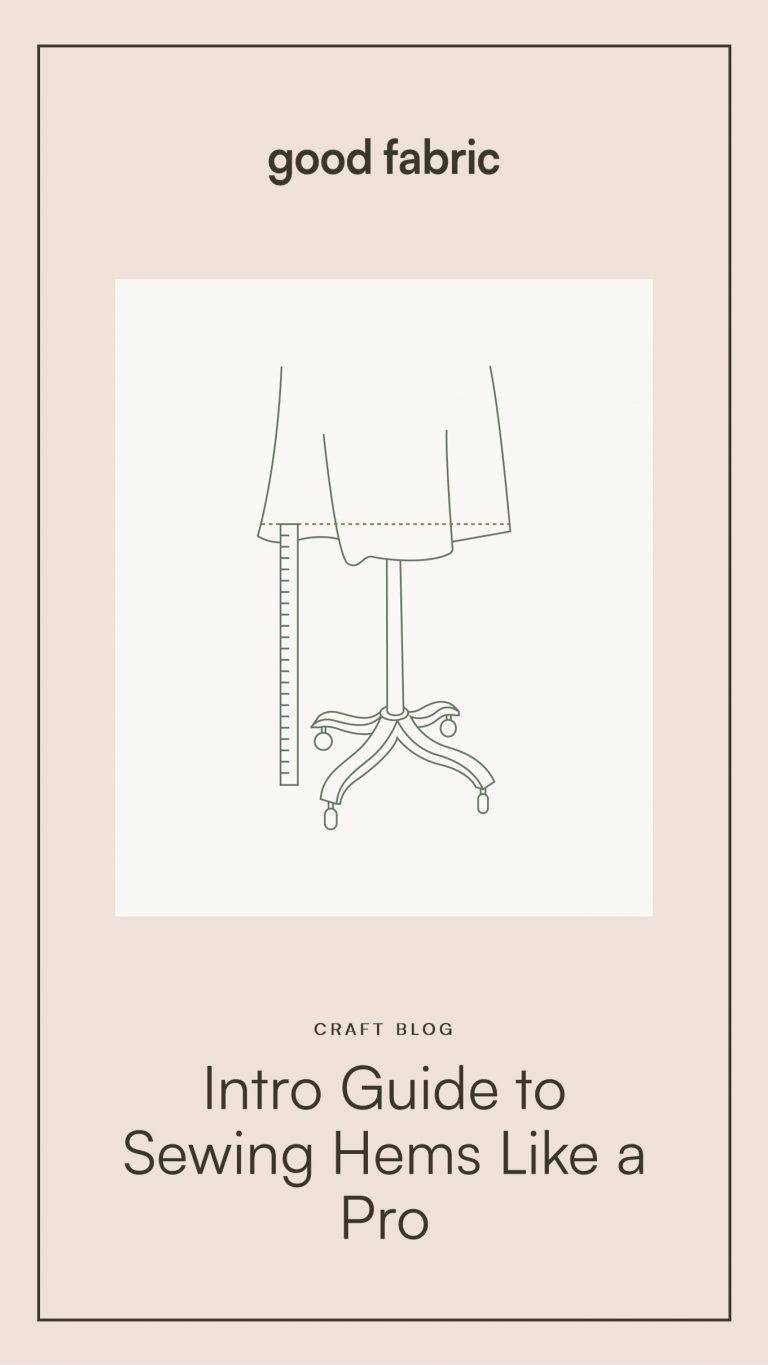
After you’ve let your garment hang, it’s time to cut the end of the fabric to ensure it’s straight. We recommend using a dress form for this. If you don’t have one, ask your most patient friend to lend a hand, wearing the garment for you as you adjust it. Measure from the floor to your garment and use pins to mark an even hemline. Alternatively there is a fancy gadget called chalk hem marker that does this job too. Cut off the excess, and there you have it: your perfectly straight hemline! Easy peasy.
Let’s Get Sewing Your Hems
Now it’s time for the tricky bit. Your hems can be finished in a whole variety of ways: with or without a sewing foot, by hand, or using a machine. At Good Fabric, we’re home dressmakers and definitely not haute couture professionals (can you even imagine the stress?). So, we’re going to look at the most common methods for creating a simple hem. Let’s dive into it!
Using A Good Old Sewing Machine
You don’t always need fancy or expensive machines to create good hems. Your basic sewing machine will do just fine! If you’re taking this route, the preparation of your fabric is key.
First, you’ll need to press your hem – do this once for knitted fabrics and twice for woven fabrics. This isn’t always quite as easy as it sounds and can be a super tedious part of the hemming process. That’s why we use a sneaky hack to save time! Simply iron seam tape onto the very edge of your hem before folding the fabric in, and repeat a second time if needed. It’ll save you so much time and make hemming a lot more enjoyable.


If seam tape isn’t for you, you could also try Clover Hot Hemmer, which is a more traditional option and works just as well. Essentially, this is a ruler that you iron onto the fabric, making it easy to create straight, even hems. It is a bit more time-consuming than hemming tape, but if you want precise accuracy, this is the option to go for.
For woven fabrics, stitch your hem 1-2mm from the folded edge using a long stitch. For knitted fabrics, opt for a twin needle for a professional finish and make sure that the raw edge you’ve folded in is between the two needles.
What About Hem Sewing Feet?
Hemming feet can make the whole process easier and leave you with a sharper finish. If you’re interested, here are the top options for simple hems.
- Rolled Hemming Foot – This fancy foot creates small double-rolled hems at the edge of your fabric, doing the hard work so that you don’t have to. The feet come in different widths depending on how large of a fold you’d like. It’s a fairly easy way to get a secure hem with no frayed edges for a really high-quality finish. You also don’t have to press your hems first, which is fantastic if you find that a bit of a chore like us! However, we do have to say that this isn’t always a simple foot to master. Practice on an old bed sheet first, and save your sustainable fabrics for when you know you’re ready.

- Blind Hem Foot – If you’re looking for a hemming foot that will save you time, this is a great choice. Usually, blind hemming (or invisible hems, as they’re also known) is done by hand which takes a fair amount of time, but with this foot, you can get the job done far quicker. We’d advise you to press your hem twice first and then price it outwards, creating an S fold, sliding the top layer to the left by about 7mm. Select blind hem stitch on your machine and off you go!

Can You Hem On Your Overlocker?
Hemming on your overlocker is actually pretty easy! It’s very versatile, too, with plenty of different techniques to get the hem you want. Here are some different tutorials to check out:
- Blind hem – If you don’t want to invest in a blind hem foot, you can create these neat hems on your overlocker. You will need to use only 2 threads on your overlocker – right needle and lower looper. Set your stitch length and width to widest option. Press the fabric once, then turn on itself. Once you are ready to hem, ensure that the needle catches the soft fold. If this is all too confusing and you like a visual, take a peek at this easy-peasy tutorial by Sew Essential and give it a try!
- Lettuce hem – This is a really pretty hem that’s moving into the more decorative hem world. The Sewing Retreat has a great tutorial on how to do these on your overlocker

- 3-thread rolled hem – A neat and professional way to create hems on your overlocker that has a slightly rolled edge but overall flat finish. Watch this tutorial by Sew Essentials and try it out on your garments.

Creating Blind Hems by Hand
If you love to sew by hand and find it a therapeutic, soothing past time, you can skip the machines and create your hems the good old fashioned way! Sit by an open window, pop some music on, or even watch TV as you hem away.

For you hand hemming, you will need to master slip stitch also known as blind hand hem stitch. You may see a few tiny stitches on the right side of the fabric, but these will only visible to us sewists who are in the know about these things – and we won’t judge! Here’s a really clear tutorial from Tailor Crazed with everything you need to know.
A Final Note
Before we leave you to start sewing your hems, we have a couple of final things to say. Firstly, if you’re looking for professional, high-quality hems (the type you’d need if you want to sell your garments, for example), then you can invest in a coverstitch machine. These aren’t always cheap, but they’re exceptionally good for tricky fabrics, like jersey. Check out this blog by Threads Monthly all about pros and cons of coverstitch machines.
If hemming isn’t your thing, try working with fabrics that don’t need them. Raw edges are usually a-okay on knitted fabrics as they don’t fray. Denim is another material that doesn’t necessarily need hems – the frayed look is pretty cool!
Learn More With Good Fabric
We’ve covered most of the common hem options in this introductory guide. Now it’s time to test them out! If you’re looking for materials, browse through our range of sustainable fabric and stock up so that you’re always ready for your next project. Or, head over here for indie patterns to inspire your next garment.